Sunday, September 9, 2012

New Look 6648, Simplicity 3503 and a whole bunch of other stuff I've sewn this summer


I will be going back to work soon. That statement, as simple as it is, has some huge implications for myself, and for my family, as you can imagine. My job is a seasonal one - I work roughly the same months as a school year - and I held this position last year as well. But this year, I will be working nearly twice the hours as last time.  I honestly am not sure if there are enough hours in the day for that to be possible given the laws of physics, but I will give it a try.


One result of this pending employment is that I decided to close my store, a painful decision, I assure you. But I needed to free up as many hours as I could and something had to go. I know my sewing and scrapbooking will already be on the chopping block, and the only thing left was the store. So, I had a big Labor Day sale, cleared out a bunch of inventory, and closed up shop. So many people have contacted me since closing to see if they could help me get rid of my remaining inventory, but the truth is, what little I have left I will be keeping for myself! Like I said, my job is seasonal, so come next summer, I will be sewing like a fiend again.

Which brings me to my next point. I've been trying to sew up as many things as I can before I have to say goodbye to my machines for 7 months. With three young kids at home, I didn't sew nearly as much as I wanted to this summer, but I was able to make a few things - mostly for myself! Is that selfish??

As it has been way too long since my last blog post, I've got a lot of ground to cover here. My long-suffering husband took all of these pictures in one day, right in the middle of a Michigan game no less, so he earned major husband points. With so many pictures, I'm going to keep my narrative to a minimum here; I'll write up more thorough descriptions of these pattern on patternreview.com.

First up is one of my favorites. I adore this New Look pattern - it is just so quick and easy to put together. It is also such a great look right now, and this fabric is perfect - fluid and drapey. Love it.

Pattern: New Look 6648   
This next pattern was less successful. I desperately wanted to love this dress. I wanted it to become my favorite dress of fall, perhaps my most beloved dress ever. Instead, we have something less than that. I do love the style and the colors, but the fit of this dress is terrible for me. The bust area is just way. too. big. I suppose some sort of SBA could be done, but I've never done one and really don't know what is involved, and probably could not do such a thing on a finished dress anyway. Sigh. All that beautiful teal bamboo jersey....well, I have to do something with it, as I cannot let all that fabric go to waste!

Pattern: Abacadabra/It's a Fits 1005
 I am in love with this next one. Simplicity 3503 really is one of those *must have* patterns that everyone should have in their stash. It is very simple, fits well and is incredibly versatile. I've made just about every view included in the pattern, but don't feel that I have the same dress hanging in my closet over and over. I'm also very happy with my fabric choice: a poly/rayon/spandex that I sold in the store. It gives the dress a feel of ...romantic sophistication, if that makes any sense at all!

Pattern: Simplicity 3503

Here is another top I'm tremendously pleased with. This is the first time I've done a Style Arc pattern, and I love the results. Style Arc has some fantastic patterns - very much on trend and not too fussy. I just wish they had more than one pattern size included, especially as they are very expensive. 
Pattern: Style Arc Island Ali Top

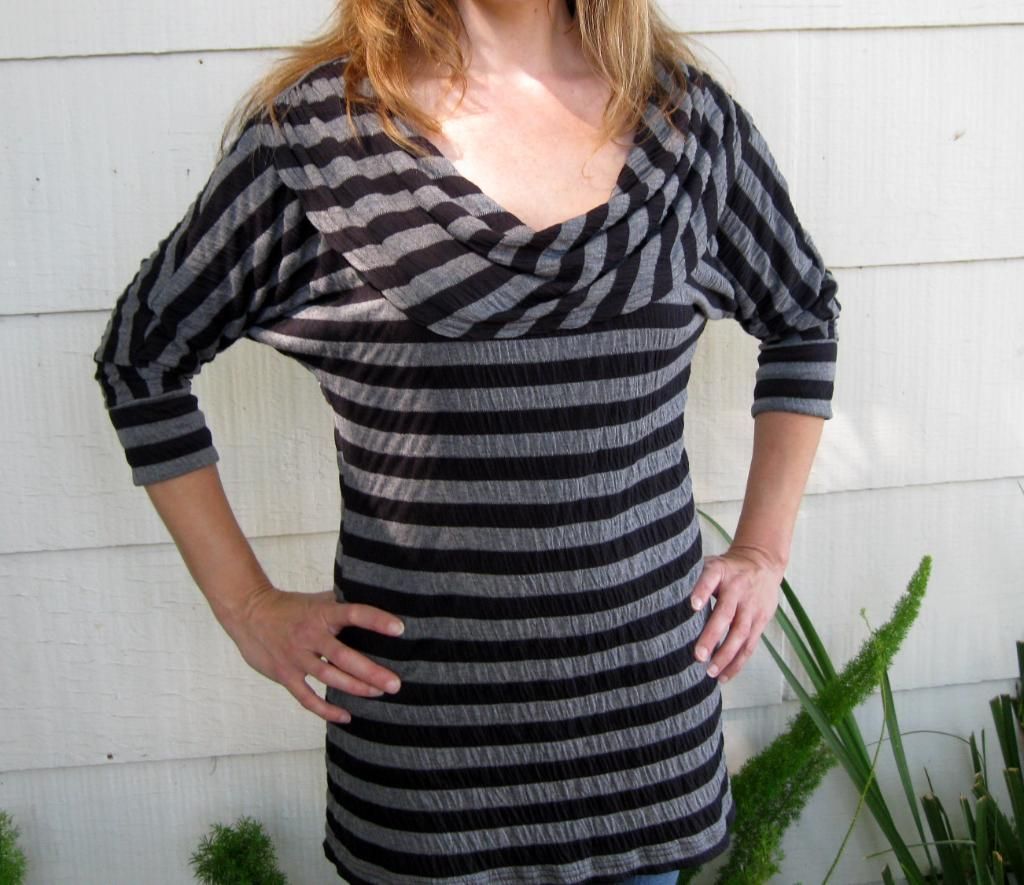
Next up is a Hot Patterns top that I made from some fantastically soft supima cotton knit that I used to carry. Love the colors on this one! The top came together quite easily, and I love the cowl neck. But, as with many Hot Patterns....uh, patterns, it runs pretty big. I made the smallest size, and if I make a sudden move the top will slip off my shoulders! My husband is greatly amused by this, but me, not so much. Oh well, I still like it - I just have to be very careful when I wear it!
Pattern: Hot Patterns 104 Butterfly Top (OOP, I believe)
Let's see....what next? Ah yes, I made myself a Kwik Sew hoodie out of some fabulous teal paisley sweatshirt fleece. I used to carry this in red too, and stupidly did not save myself any before it sold out completely. I only had a tiny bit of the teal, and very wisely kept it for myself rather than list it. This pattern is incredibly simple and really a no-brainer. No bells and whistles, so it is excellent for beginners, or when you want to let the fabric do the talking.
Pattern: Kwik Sew 3155 (Also OOP, I think)
Here we have McCall's 6203. I'm not 100% in love with this one, but close enough. It doesn't have much shape, so I took off a couple of inches at the side seams, which did help. I also tried belting this, but I really do not have much luck with belts. I'm not sure if it is my belts or my body, but whenever I try belting something, I end up looking like a sausage with a rubber band around its middle. Not a terribly attractive look. So, no belt, but I think it's OK. I used a really cool fabric I found in SF ages ago; it's hard to see but the stripes are kind of puckered, giving it an unusual ruched look. Love it.


Pattern: McCall's 6203
This next top is not terribly exciting, but I do like it as it is light and airy, perfect for summer! Plus, I used some of the popular birds on a vine knit that I used to carry - such a fun print! This is Simplicity 3536, which I keep turning to over and over again, as the views are so varied, giving you terrific versatility. Looks like this one is also OOP - goodness, you really do have to stock up on these patterns when you have the chance!
Pattern: Simplicity 3536 - OOP
Still with me? Good! We're getting there, I promise. Just think of my poor husband who had to take all these pictures while he was trying to watch a football game.

This dress is one of the easiest, fastest knit dress patterns of all time, and I love it for that reason. I think it would be impossible to screw up! I used a chevron ITY print for this one, and think the overall effect is fairly dramatic. Can't wait to wear this one in the fall.
Pattern: New Look 6722

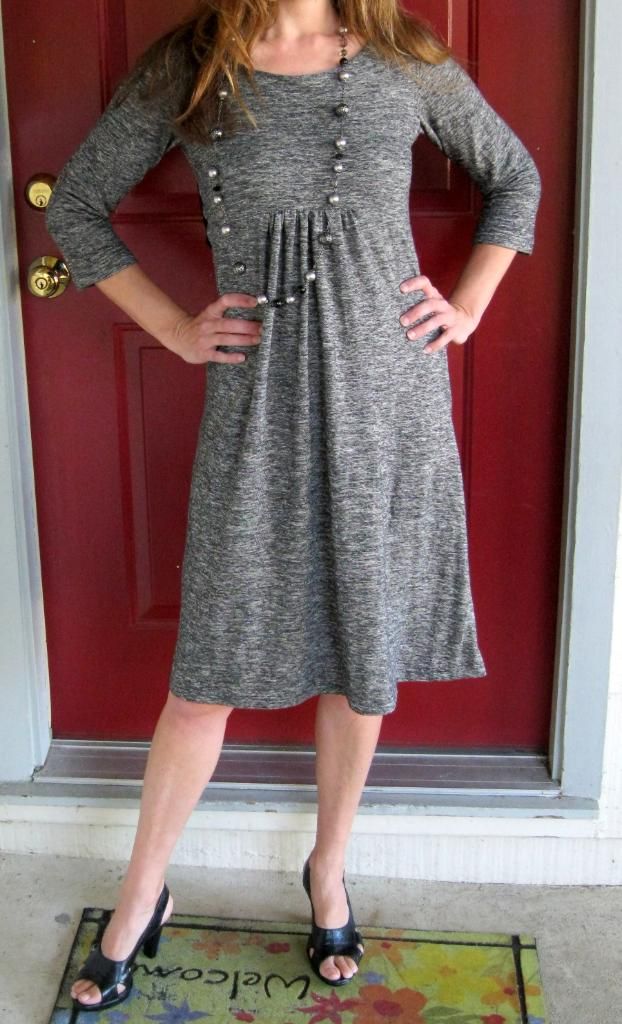
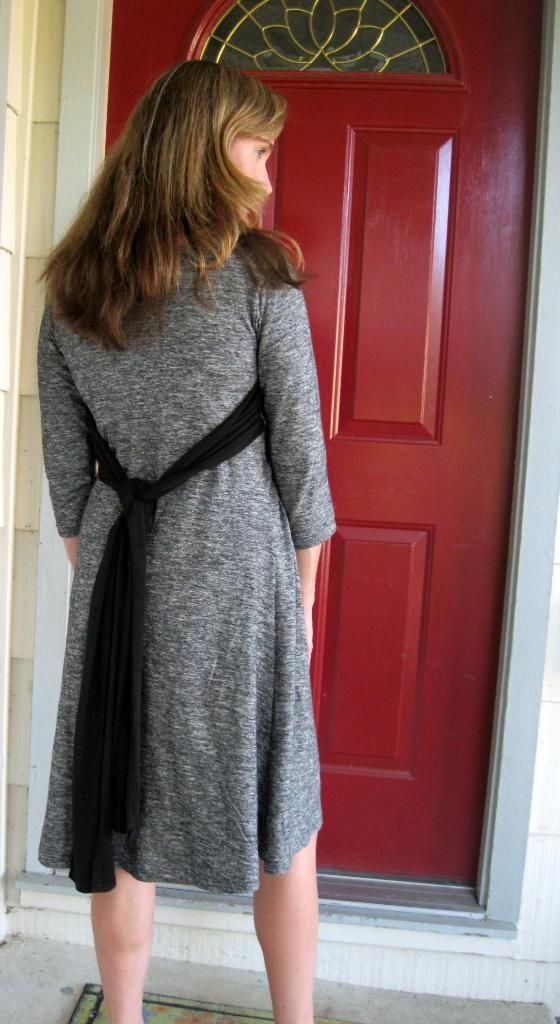
OK, final one, I promise! I saved the best for last. I am so, so thrilled with how this dress turned out, particularly as I was using the last of this space dye hemp jersey that was in extremely limited supply. The manufacturer sold out of this in the blink of an eye, and it won't be made again. Talk about pressure as I was sewing this up! 

Lots of people on Pattern Review have experienced difficulty with this pattern, Butterick 5246, which kind of surprised me. I've made it before and love it, although I do admit it has a few quirks. The sleeves are pretty narrow. Don't try to do the overlay - trust me on this one, just don't even try it. Waste of time. Otherwise, I think the style of this dress is really beautiful and elegant.

Lots of pictures because I love it!
Pattern: Butterick 5246 (you guessed it - OOP!)

And that is that. Next time, I'll concentrate on the kid sewing I did this summer, which was not nearly as much as the sewing I did for myself. Hmmm.... I do feel rather guilty about this. Winter is right around the corner and the only kid who has clothes for that kind of weather is my youngest, who can wear his brother's hand me downs. I guess I better get started.....RIGHT NOW!


Saturday, June 9, 2012

Fabric Paint and Rhinestones with my Silhouette Cameo

My Silhouette Cameo and I have had a wonderful week of bonding. There's just nothing like the rush of discovering a new crafty thing to obsess about! First up: fabric ink.

I've used fabric ink in the past, of course. I've done a few freezer paper stencils, which I painstakingly hand-cut. I loved how they turned out, but oh, how time consuming to cut the stencils by hand! I knew the Silhouette could do it for me much faster, so I finally decided to experiment a little.

First up were these shirts for my oldest boy. The background templates are from Silhouette; the Godzilla and basketball player are random silhouettes I found on the internet. I used the trace and cut feature in Silhouette Design Studio to cut them, which is really easy for simple designs like these. 

I first did the background stencils (the checkerboard and sunburst), cutting them out on freezer paper, ironing them onto the shirt fronts and then applying the fabric ink with a sponge brush. After the paint dried (4-5 hours), I peeled off the freezer paper and repeated the process for Godzilla and Mr. Basketball Player. I did run into some problems with this step: the freezer paper does not adhere nicely to the paint layer. The black paint bled through and left unsightly globs on the silver checkerboard and orange sunburst. This was not a total disaster, as I just touched up the areas that bled through with some more silver or orange paint. But it made me think that perhaps freezer paper is not the best thing for layered images such as these - next time I will try vinyl. The final step is to heat set the ink with an iron and a press cloth.


Pattern: Farbenmix Quiara
Fabric: Cotton lycra
Background images: Irregular Checkerboard and Sunburst from Silhouette Online Store

I also did these shirts for my littlest guy, who just turned four. He is such a little charmer that one! I asked him if he would like a smiley robot shirt, and his heart-warming response was, "NO! I do NOT want a smiley robot shirt. If you make me a smiley robot shirt, I'm going to be SO mad!"

Tough cookies, my friend. You are getting a smiley robot shirt whether you like it or not. Once he saw the end product, he was delighted. I guess he's still working on his creative vision.


Somehow, I managed to get a smudge of red ink on the side of the shirt. I was not about to re-do the whole thing (life is way too short for such perfectionism), so I just covered it up with some grosgrain ribbon. Decided I kind of liked the look, so added more grosgrain ribbon. Voila! Mistake covered up and "design elements" added. Just as before, I experienced some bleeding of the red paint underneath the freezer paper onto the first layer of paint, but again, I just touched it up without too much difficulty.

Pattern: Farbenmix Quiara
Fabric: Cotton rib knit
Images: Smiling Robot and Nesting Zig Zag Rings from Silhouette Online Store

I do own the Fabric Ink Starter Kit sold by Silhouette which uses vinyl for the stencil medium. I held off using the vinyl since a) it is WAY more expensive and harder to come by than freezer paper and  b) you can't just iron it on - you have to use transfer tape to get the stencil applied to your fabric. 

However, vinyl has one significant advantage over freezer paper: the Cameo cuts it MUCH more cleanly. I originally tried to cut Go Kart image below (which I found on the internet) using freezer paper but it just wouldn't cut cleanly. Too many little details for the thin freezer paper. Now, this could very well be that I need to change my blade (which I have not done since I first bought the machine months ago) or that my mat is a wreck (if you saw it, you'd vote for that possibility). Not having either a new blade nor mat handy, I decided to give the vinyl a whirl.

Unfortunately, the instructions that come with the fabric ink starter kit are ....sparse, and that is putting it generously. I had never cut this type of vinyl before, and from the picture in the instruction booklet, it looked like they were loading it in without a mat. Really? No mat? I'd never done such a thing. My first few attempts were a disaster: the vinyl got all crinkled up in the machine upon loading. I eventually found a blog post (sorry, I don't recall which) that explained that you have to uncheck the "Cutting Mat" box in the Cut Settings window of Silhouette Design Studio. Well, that may have been a nice piece of information to include in the instructions and the DVD! You also need to adjust your rollers for the size vinyl that comes with the starter kit. I had to look that up too.

Once I finally got the vinyl loaded properly, the Silhouette cut the image out like a dream. Yay! The next step was to apply the transfer tape and "burnish" the design. I am embarrassed to say I had no idea what that meant. The booklet does not explain, nor provide a picture of said "burnishing" but luckily I deduced from the video that it means to rub transfer tape onto vinyl with a credit card like object. 

I removed the vinyl liner and applied the stencil to the fabric and burnished once again. Then I tried to peel off the transfer tape. Well, this did not go all that smoothly. All those little lines of vinyl that provide the detail of this image wanted to stay stuck to the transfer tape, not the fabric. Making this more difficult was the fact that the transfer tape and the vinyl were basically the same color. Next time, I will get magenta colored vinyl so I can see what I'm doing!

Finally, the stencil was applied and I was ready to paint. I used the sea sponge that came with the kit for this one, as I wanted a more distressed look. I absolutely adore the end result of this shirt. So cool! My little guy is happy too.

 Pattern: Farbenmix Quiara
Fabric: Cotton lycra

In the spirit of being thorough, I should say that I have not washed any of these shirts yet, so can't comment on how well they go through the laundry. However, as noted above, I've used fabric ink on several occasions before, and haven't had any problems with fading or peeling or anything after multiple washes. I throw everything in the dryer too. No problem.

OK, enough fabric ink! On to rhinestones! 

I also got the rhinestone starter kit (can you tell I took advantage of Silhouette's Mother's Day sale?). My daughter was thrilled with this concept, as she loves all things blingy. The rhinestone process is much more straight forward than the vinyl fabric ink, so I had no difficulty whatsoever with the instructions contained in the kit. I did have some problems getting the rhinestones in the proper place  on the template - it is much trickier than the video would suggest to just "brush" them into place. Rhinestones do have a tendency to flip over. I finally got one of these handy tools, and the process became infinitely easier.


 Pattern: KleinVlieland
Fabric: Cotton knit
Rhinestone template: Rhinestone Flower from Silhouette Online Store

I also made this butterfly shirt, which has become my daughter's favorite! This shirt I HAVE washed and, several times now in fact, and the rhinestones have come through perfectly.

Pattern: Farbenmix Gitta
Fabric: Black bamboo jersey from Bamblue Fabrics
and butterfly cotton knit 
Rhinestone template: The butterfly image that comes with the kit

So anyway, I had a ton of fun making these, and see many more inky and rhinestone-ish crafty endeavors in my future. Fun fun fun!

Saturday, June 2, 2012

Sewing with Tribal Prints

They are all the rage right now, those tribal prints. I'd been looking for some great ones to stock in Bamblue for awhile, and finally came across these amazing ITYs that make a serious statement. As I'm an absolute sucker for vibrant, eye-catching prints, I had to sew these up immediately.

To me, these prints have "maxi-dress" written all over them, so I pulled out my tried and true Simplicity 3503. This is such a quick and easy dress to whip together on a Saturday morning. Comfy too; I've been wearing it all day, although I'm sure my fellow library patrons thought I was a tad overdressed for the occasion. The ITY is fabulous, as you don't need to worry about how it will wash and it doesn't wrinkle. This is very nice quality too: not too heavy, nor too light, with wonderful draping properties.


Pattern: Simplicity 3503
Fabric: Ikat Print ITY from Bamblue Fabrics

I also wanted to do a tribal-ly McCall's 6109 (sadly, OOP now) with some contrast fabric for the bodice. I've done this one a couple of times, and have found that the view with the tank-style bodice runs a little short. I added about 2 inches, and I think I prefer the fit this way (although I am very long-torso-ed, so that probably has something to do with it).

 Pattern: McCall's 6109
Skirt Fabric: Tribal Print ITY from Bamblue Fabrics
Bodice Fabric: Black Bamboo Jersey from Bamblue Fabrics 

Moving right along in my tribal print love affair is New Look 6648, one of PatternReview.com's best patterns of 2012. I could not agree more with that assessment. Such an easy, comfortable and stylish pattern! The only thing I don't understand at all is why the pattern calls for cutting out the hem band with the grain rather than against it. I was very troubled by this, particularly with this striped print - the stripes go the wrong way! I decided to leave it as is, thinking that perhaps the band is meant to be very tight across the hips? I'm still not sure. My hubby, who usually tells me when I've made something that looks ridiculous, assured me that it looks fine, so I'm leaving it.

Pattern: New Look 6648
Fabric: Chevron Snakeskin ITY Print from Bamblue Fabrics

Oddly cut hem band aside, I loved the pattern so much that I wanted to make the sleeveless cowl neck version too. I decided to use my orange honeycomb ITY for this one. I love the top and the end result, but I have to say, hemming the armholes on this thing gave me fits! The shape of the armhole is fairly steep, then takes a precipitous curve, making hemming a nightmare. Next time, I'll just do facings.

 
Pattern: New Look 6648
Fabric: Orange Honeycomb ITY from Bamblue Fabrics

And now we come to something that I've been trying to make for two years and have just not gotten around to it. This winter, I swear to you, not a day went by that I did not wish for a basic black, drapey, sweater knit cardigan. I had the patterns. I had the fabric. The time? Not so much. I almost, almost broke down and - gasp! - bought a RTW model. But I couldn't bring myself to do it. So, I didn't get around to making this until May when it was 85 degrees. I'm telling myself that I'm just very on top of things concerning my winter 2013 sewing progress.


I used McCalls 6084, which ended up being not as drapey as I was hoping. It also has a dart by the shoulder that I don't understand in the least. I'm sure it is meant to add to the drapi-ness, or the fit, or something, but frankly, I'm not seeing it. Also, trying to transfer the dart markings onto this type of sweater knit was just not happening for me, so there is a very good chance that my darts are in the wrong place. Well, who cares. I like the end result, and it certainly fills the bill.

Nice fabric, no? I wish I had some to sell, but sadly, I do not.
 Pattern: McCall's 6084
Fabric: A divinely soft sweater knit from Fabric Outlet in SF

This next one has nothing to do with tribal prints, or ITY, or seasonally inappropriate sewing, or anything like that. But with this one, I took the wildly unusual step (for me) of using a woven to make myself a dress. It's got a zipper in the back and everything! This is New Look 6557, a pattern that I'm sure every other seamstress in the world (except me) has sewn a million times. It's a really easy pattern, so I can see why it is so popular. I used a rather transparent cotton lawn for this dress, so I lined the whole thing, but otherwise I made no other modifications.


Pattern: New Look 6557
Fabric: Cotton lawn

That's all I have to show you today. But now that I've gotten tribal prints out of my system, I cannot wait to get the new supima cotton floral knits that I"ve got coming in the next week or two. Stay tuned for my next obsessive sewing chapter!

Thursday, May 31, 2012

Sewing for Kauai

After five years of nagging my husband for another trip to Kauai (the nagging commenced approximately 48 hours after returning from the last trip), he finally relented when I discovered a $322 air fare deal (thank you Hawaiian Airlines!). As a result, in early May we spent 10 days in paradise. Our adventures could easily span several blog posts, but I'm trying to keep this particular blog sewing-related, so I won't go into the details of snorkeling, visiting a different beach every day, enjoying some delicious locally grown food, or touring a dairy farm (all of which were amazing). 

I have been collecting Hawaiian-themed fabric over the years in preparation for a much-wished-for trip to Hawaii, and finally, here was my chance to use it. The first fabric I pulled out was my Alexander Henry Lei Hula Girls fabric, which I just adore. I love it so much that I almost used it to make a bag for myself, but decided it would probably look cuter as a dress for my girl. 

Pattern: Modkids Isabel
Fabric: Alexander Henry

Another fabric I've been hoarding forever is this Aloha Harajuku Girls fabric. I love this fabric, but I had a heck of a time figuring out what to do with it. The problem is that it is a really thin jersey, more suitable for a t-shirt than anything else, but I really didn't want to waste it on just a plain t-shirt. I finally decided on a double layered dress. The end result is OK - not quite what I envisioned, but not a total waste of fabric either.


Pattern: Farbenmix Whitney, modified to be a dress

About two days before we left, I was digging through my fabric and found some Michael Miller Pua Wahine fabric, which I had totally forgotten about. Aack! I didn't have much time, but clearly I HAD to make something out of it. Thinking I was being very clever in allocating time properly, I chose the super easy Girly Skirt pattern from Pink Fig. Except that when it was finished, I decided it really needed a cute, embroidered top to go with it, and not just any embroidery, but the Hula Girl embroidery from Urban Threads which is gorgeous but takes something like 75 minutes to stitch out. The point is, my super-quick, last-minute project turned out to be anything but quick, but I do love the end result. As an aside, the bamboo french terry takes embroidery SO well - probably the easiest fabric I've ever embroidered on.

Skirt Fabric: Pua Wahine from Michael Miller
Top Fabric: White Bamboo French Terry from Bamblue Fabrics
Top Pattern: Farbenmix Whitney
Embroidery: Urban Threads

Another UT embroidery that I absolutely had to use for our trip was their "Big Island" design. I had initially envisioned using it in some retro, OP-ish way for one of my boys, but decided, wisely, that neither of them would appreciate the "girly" flowers incorporated into the design. So, my daughter got another dress.


Pattern: Klein Vlieland
Embroidery: Urban Threads
Fabric: Oatmeal & Lavender Stripe from Bamblue Fabrics

Of course my boys needed some new duds for the trip too! First, some basic, but much needed shorts for my oldest. I made a couple of these for him last year, and they are his absolute favorites. He would happily wear this style everyday, throughout the year, even in the freezing rain if I let him. These are an Ottobre pattern which sadly does not go up to his new size (ie, "gargantuan 9 year old").  So, I just lengthened them and, instead of using a grosgrain ribbon on top of the side seam as trim, I added a side panel. Worked like a charm - the fit is quite good. I used the heather gray and heather indigo bamboo french terry for these - so soft and comfy!

Pattern: Ottobre 3/10, #17
Fabric: Bamboo French Terry from Bamblue Fabrics

Ages ago, I bought this striped t-shirt in a thrift store, with the intention of cutting it down to size for one of the boys. But my oldest is going through a phase where he likes all of his shirts to be tent-like in fit. I tried to talk him into letting me cut it down to a size more suitable for a skinny 9 year old than a fully grown mountain troll, but he was having none of it. So, I left the shirt as is, but added the Urban Threads tiki embroidery to it.

The embroidery, which took nearly two hours, stitched out like a dream. I always hold my breath during these long embroidery designs, thinking that for sure my machine is going to go into diva-mode in the final minutes of the design and ruin the whole thing. Luckily that did not happen. Breathing a sigh of relief, I stitched the embroidered panel onto the shirt using my other (usually complacent) machine - which ate the fabric on the final turn. And I do mean "ate" - the fabric was so jammed into the feed dogs that I had to rip it out, leaving a hole approximately 1.5 cm wide. Hence the lizard button in the corner.

Embroidery: Tiki Mask from Urban Threads

I think I became Urban Threads' best customer in the weeks leading up to our trip. My little guy also got a shirt featuring a UT design:


Embroidery: Urban Threads

I even made something for my husband. A dear sewing friend of mine (who has the incredible luck of actually LIVING in Hawaii) gave me this fabric a couple years ago, and my husband promptly claimed it for himself. I made him a Jalie button down shirt, which I will never make again, because the collar is hellish. But my DH seems to really like the shirt, as he wore it several times on our vacation.

Pattern: Jalie

I also made a few things for myself, a few of which I showed on my last post. My favorite of all, though, is this dress. I plan on making MANY more of these, because they are so easy and comfortable!

 Pattern: Kwik Sew 3703
Fabric: Cotton/lycra from my stash

I can't resist adding this picture, even though I actually made the green Farbenmix Lore below a year ago. The embroidery on the back says "dream" which I thought was appropriate given the setting!


And finally, as anybody who sews understands, I can't go anywhere without checking out the local fabric stores. Kauai has some great ones! I got most of these at Vicky's Fabrics in Kapaa. Now I'm fully stocked for another trip!